
Quality Video Production On A Budget
You’ve heard the murmurs and felt the pull for a few years, and now you KNOW it’s time to launch a YouTube channel to support your growing business. You’ve jotted down notes about all the awesome videos you want to make, have a vision for how you want things to look, and even have a sort of script in your head about how you’d begin and end the amazing, engaging content.
BUT – when it comes to the tech setup, all that excitement fizzles into fear around buying the wrong camera, wasting money on the wrong lenses or cables, oh, and editing? Yikes! That’s a whole can-o-worms on its own!
Where to turn? What to do?!?

Before your entire YouTube channel creation comes to a screeching halt, this is the article you need. I’m here to make sure all your awesome content-creation dreams don’t go down the drain simply because of option overwhelm, tech troubles, or analysis paralysis.
You’ve got a business to run, remember? And this new YouTube channel adventure is supposed to help your business grow, right? So let’s get you confidently creating video content to draw in new leads, grow your business’ following, and generate some moolah ASAP.
Your Strategic Video Marketing Arm Doesn’t Have To Be Expensive
When you look at video marketing the old-school way, corporations spend thousands of dollars on their video marketing budgets, from hiring a production team, writers, actors, and videographers to renting out studios to record.
YouTube wasn’t as mainstream as it is today, so everything was TV quality and required a really big production and the budget to go with it.
Lucky you because these days, creating high-quality videos does not require paid actors, directors, a set or studio, multiple camera angles, professional video production equipment, or high-cost video editing software. In fact, most of the equipment needed to get your own video marketing arm started can be low-cost or even free if you use equipment you already own.
As your first step, I challenge you to take inventory of some of your favorite channels and videos. If you don’t have any yet, it’s time to start exploring! Your job in this first task is to take notes on what you like and dislike about various channels.
Notice whether your own video-channel go-to is Instagram reels, stories, or YouTube. Write down what they’re doing well and what you’d change if it were your own production. During this process, don’t be surprised if you happen to snag some excellent ideas for your setting, lighting, camera angles, and even content that connects with your ideal channel subscriber.
Pre-Production Checklist
An essential part of video production is your pre-production planning. Planning ahead can save money and significantly affect how much time you spend creating your video content. After you’ve watched several creators’ videos and have established a list of likes and dislikes, you should have a pretty solid idea of what you want your videos on your channel to be like.
Start With The End In Mind
An excellent rule of thumb is to have one topic and one CTA (call to action) per video. As you map out your first or next piece of video content, think through this bullet list:
Visualize your final product: What is your ideation for this video? What message is your video trying to send? Who is your target audience? How will viewers find your content?
One essential piece of creating video content is deciding which platform(s) your video will be posted on, and letting that determine how you use the camera during recording.
Determine Your Videos’ Resolution and Dimensions Based on Purpose
Do you need to shoot in portrait (vertical) or landscape (horizontal) mode?
-
Landscape: If you are posting to YouTube or a website, including this video in an email blast, if most of the views will be on a computer or television, or if it is a longer video, then you’ll want a landscape recording. (wider than it is tall)
-
Portrait: If you’re planning to use the video on social media or create quick/shorter videos (60 seconds or less for social media or YouTube shorts), then portrait mode is the best. (taller than it is wide)
Quick note: Most video (approximately 94%) is now being consumed on smartphones. Therefore portrait mode is being widely used, even though most high video production is done with landscape mode. If you plan to post your long-form content on YouTube with smaller clips on social media, then I suggest recording in landscape, but editing the content during the post-production process into short, portrait-size clips.
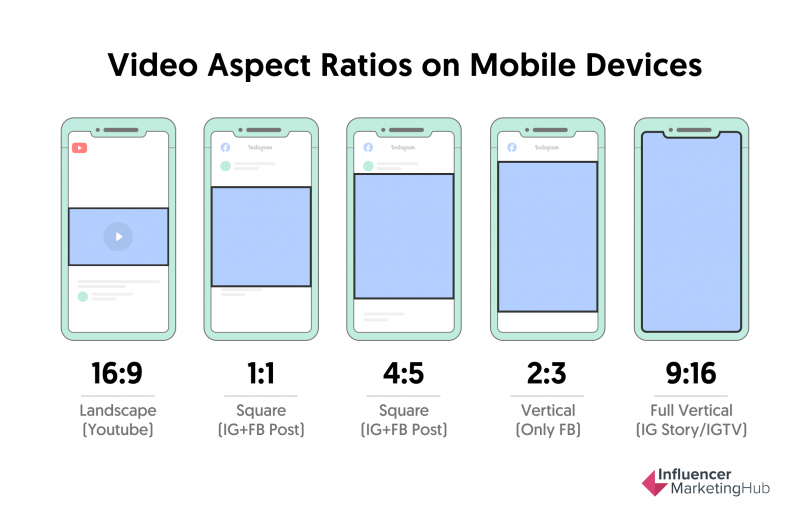
Check the video aspect ratios for each social media platform on which you plan to post to give it the desired view.
-
Landscape: a 16:9 ratio, generally 1920 x 1080 pixels
-
Square: any size, as long as height and width are equal. Could be 500 x 500, or 1080 x 1080 pixels, just ensure it’s a 1:1.
-
Full Portrait: 1080 pixels x 1920 pixels or [9:16]
Also, check the video resolution requirements for each platform to give it a crystal clear picture. I suggest always recording with the highest setting dimensions along with the one with the most pixels because then you will be able to always go to a lower resolution and aspect ratio to fit a certain platform, but you can’t ever increase recording quality post-production.
Write Your Scripts and Topic Outlines
Scripting or subject notes: Preparing your scripts or notes pre-recording will help keep you on track while the camera is on. I’ve found that some bullet points on a whiteboard just behind the camera can be quite useful in preventing rambling, awkward pauses, and the accidental exclusion of key points. This keeps you from re-recording over again and saves a lot of time during the video editing process. Your message must be clear and easy to follow for your subscribers.
I find that when we mention scripting your videos, the main objection is that you want to seem natural on camera – as if the video were unscripted. While that’s a nice goal, getting there takes practice. In this case, practice means scripting out what you want to say and running through it multiple times before hitting that ‘record’ button.
Then, when you’re confident you can get through the topics, have that bullet point whiteboard behind the camera filled out with prompts for your three takeaways, segues in between points, and a call to action. With these reliable steps in place, you’ll progress toward seeming natural on camera with each new video.
Consider Your Setting and Casting Needs
Most social media and/or YouTube videos these days don’t require cast members. However, use people you already know if your video idea requires extras. Perhaps you have friends, family, business besties, or employees already on payroll.
If you have employees, why not showcase them in your marketing videos? Your people have helped you bring your brand to life. By showing your own people in your videos, you’re unifying your team and creating a sense of pride in your business.
Don’t have employees yet? Try hiring aspiring actors or students. These gigs can be listed as experience in their acting portfolios, and many are willing to trade the screen time for experience. (It’s important to note, however, that offering to pay for their time is recommended and appreciated.)
Producing High-Quality Footage with Budget-Friendly Equipment
Ready to move on and tackle the tech? I thought so!
This is probably where people get the most excited AND the most overwhelmed simultaneously. Hey, I get it! It’s pretty dang exciting to pick out new gadgets, especially if making that purchase means you’re moving closer to accomplishing a major business/marketing goal.
So, let’s dive into the actual process of setting up your equipment and recording your content footage. This is where all your props, equipment, potential cast members, and lighting will come into play.
Picking the Right Camera for Your Video Content & Your Budget
Despite popular belief, high-quality video content can be created without expensive cameras and extra equipment. Many content creators have used low-budget equipment for years and consistently produce stunning results.
-
Use your cell phone for quality video. Most cell phones produce excellent, quality videos. In many cases, they have better video and photo quality than some of the cheap cameras sold on the market. The newer the smartphone, chances are, the better the video quality.
-
Use your GoPro. Yes, really! GoPro has been widely marketed as an adventure or action video camera, but that doesn’t mean it can’t be used to record your YouTube videos or other content. If you have one, test it out and see what kind of results you get. Get a GoPro Hero10.
-
Use your DSLR or digital camera. Your digital camera may have a video mode that captures video in full HD 4k recording. Utilize your camera gear to get incredible vivid detail without buying an actual video camera. A highly recommended DSLR camera: Canon EOS77D Another highly recommended digital camera: Sony ZV-1 Digital Camera
-
Use your Webcam. Another budget suggestion is to utilize your webcam to make videos. Most modern laptops have cameras built-in, making it a simple and budget-friendly way to create videos. While many desktop computers require external webcams, some people do find them to create a wider angle than is desired. This will require additional video editing in the post-production process. My recommended webcam: 1080p with 60fps webcam
-
Borrow video equipment. Some schools (colleges) allow you to borrow video equipment if you are enrolled there. This may be a great way to save money while using and testing out video equipment you wouldn’t otherwise get to use. Your local library might also have video equipment you can check out. If this isn’t an option, perhaps you have friends with camera gear who’d be willing to let you borrow or rent it from them.
-
Shoot from a stable surface. Even if you don’t have a tripod, make sure you have somewhere stable from which to record. Ensure you can set your recording equipment on a sturdy bookshelf, desk, counter, step ladder, or stool. The possibilities are endless.
If you choose to purchase a production-specific camera, rather than using the (probably excellent) camera on your smartphone, do your research. My big requirements were that the camera had an option for me to see that I was centered in the frame while recording and that getting the video off of the camera and onto the computer was easy. This meant I needed a digital screen that flips out and faces forward and that I could use a USB connection to save videos to my computer post-recording. What are your must haves? (☑️ write a list!)
Even if you prefer to order from Amazon or straight from Sony or Cannon’s website, take the time to head to an electronics store where they have several cameras unboxed and available to hold. Once you’ve identified the features you’d prefer in a camera and have sufficiently browsed and played with several camera models, make a decision. Either head to the counter and make a purchase right there or head home and jump online to make your purchase.
Remember, inaction and analysis paralysis is the enemy of progress! Make sure you’re in “action,” not only in “motion.”
Do Use An External Microphone
Since cameras are primarily designed with the visual quality of images and videos in mind, their built-in microphones are rarely of high-enough quality to produce sound someone would want in their earbuds. Same deal for the built-in mic on your laptop. That audio might be good enough for a Zoom call with a co-worker, but it is horrendous as a recording.
So, use a dedicated microphone separate from the built-in one on your camera or computer. Depending on the look you’re going for in your videos, it can be a lapel mic (I love this one) or a good-quality dynamic microphone on a stand or boom arm (like this bundle).
Whatever you do, avoid the temptation of a “pretty” mic like a Blue Yeti – Condenser microphones are meant for use in a sound-treated studio. So when you or I try to use them in our home office, they pick up a ton of room noise and reverb and will make you sound like you’re recording in the bathtub (don’t ever do that – electronics and water don’t mix, btw.).
Don’t Underestimate The Value Of Good Lighting
Proper lighting can make all the difference in the quality of your videos. Natural light generally creates the most appealing result. However, a lighting kit generally has RGB settings built in to help recreate daylight tones when natural light isn’t readily available.
If you need to get a lighting kit, a budget kit can cost under $100. This can either be a set of lights or a ring light. If you do plan on getting lights, be sure that it has adjustable settings, so the light isn’t too harsh or bright. Here’s the kit I bought for my videos: Umbrella Lighting Kit
If an entire kit isn’t in the budget, perhaps a single, adjustable light is worth looking into. Many are under $25 and can be attached to a tripod for easy positioning. One option is a Mini Ring light.
If extra lighting isn’t in the budget, try out these ultra-low-budget lighting tips:
Bare budget tip 1: Try using the flashlight mode on your cell phone or iPod. Most phones have brightness settings in the flashlight application to dim down the overpowering light.
Bare budget tip 2: Open a blank white page on your phone for a more subtle light. Adjust your phone’s brightness to create the desired lighting effect.
Remember To Take B-Roll Footage
B-roll might not be a familiar term to the general population, but it’s an easy and important part of video production. B-roll is just extra video content that may or may not be used in the final product. Think about bloopers, outtakes, or even royalty-free clips like scenery or slo-mo action shots like walking or opening a book.
Often, these clips may be used when cutting and joining video segments for a seamless junction to your main video production (A-roll). This footage also helps establish scenes or add intensity, such as with news stories or documentaries.
Create a list of b-roll shots you want, considering the subject matter, composition, and lighting. Be creative with your composition – remember that a different perspective or camera angle might make the scene that much more interesting.
Take your time. Some of the best videographers take way more video than they actually need because it takes time, trial, and error, to uncover the best angle or scene to communicate what they want via imagery. Take a longer segment of footage than you think you need, since it is easier to trim footage rather than go back and create new footage.
Need ideas? Review some of your favorite movies or commercials with a video-production eye and take special note of the B-roll footage. Incorporate the scenes or styles you like into your project.
Utilize Royalty-Free Music
Unless you create your own music, chances are you’ll need to acquire music for your videos. Although the name is a bit deceiving, royalty-free doesn’t mean that the music itself is free. It means you buy a one-time licensing fee and can use it for whatever you want thereafter.
Many websites offer royalty-free music at various purchase prices, depending on the way you plan to use the music and the platforms on which you’ll post or host your final product. Some offer memberships, and some allow individual music purchases. Here are some royalty-free and for purchase music sites to explore:
-
www.epidemicsound.com
-
YouTube Audio Library (found in the left-hand column in your YouTube creator studio)
-
www.artlist.io
-
www.soundstripe.com
-
www.elements.envato.com
-
www.premiumbeat.com
Post-Production: What Kind Of Editing Software Should You Use?
When it comes to video editing and post-production, you have two choices:
1) learn how to do it yourself and be ready to commit several hours to navigate the software and editing your own videos or
2) hiring an editor
Video Editing Software for the DIY YouTuber
In parallel with how video production no longer requires you to invest multiple thousands of dollars into hiring a full-blown production company, hiring someone to edit video isn’t what it used to be either. There are several excellent software options available to those DIYers, and there’s a huge community of post-production editors who work as contractors and freelancers who would love to edit your videos for you – including me 🙂
Deciding which software is best for you may depend on whether you use Mac or PC products and what kind of video content you plan to produce.
If recording using your smartphone, you may be able to use the pre-installed video software on the device. So try to utilize this free tool to see if it works for what you need.
A panel discussion of successful YouTubers revealed software they used as beginners and what they graduated to later on as experienced videographers:
-
Software used first: DaVinci Resolve, Windows Movie Maker, Apple’s iMovie,Vegas, Avid, and Be.Live are all good programs with a minimal learning curve. Some are free, some have monthly subscriptions, and a few can be purchased outright for up to $400.
-
Be.Live is geared more towards live streaming, while DaVinci Resolve and Windows Movie Maker are meant for actual post-production. Avid and Vegas both have multiple variations of their editing software that focus on different aspects of video editing. Descript is new to the space, but they’ve great job of making user-friendly software!
-
Software used presently: Wirecast Pro, StreamYard, Final Cut Pro, Premiere Pro, Adobe Rush, and Vegas are recommended as user-friendly software.
Some software also offers stock music and b-roll within the program, so you can incorporate two products in one to help keep in your budget.
When I started out, I also used iMovie to edit my videos. Now, primarily for client work, my team uses Davinci Resolve and Final Cut Pro, depending on which editor is processing your video.
The best software is the one you’re proficient at using.
So pick one, learn it thoroughly, and produce your videos as efficiently as possible. Then, if ever you feel you’ve maximized that software and need greater capabilities, explore more advanced options at that time. Remember, this is where people get stuck- in either analysis paralysis (which software do I choose?) or in the how-to struggle (how the heck do I use this software?). So, if you feel stuck or find yourself going in circles, it may be time to seek help.
Help, in this case, might be an online course teaching you how to use the software or it might be finding an editor.
Finding and Hiring a Video Editor
Circling back to the fact that you’re a business owner and you’re interested in starting this entire video production journey to use video strategically to market your business, it may not be beneficial to DIY your video post-production or channel management.
Depending on your business’s current revenue stage and structure, you’re likely already feeling stretched thin as a solopreneur, and the idea of planning, recording, AND editing your own videos makes you want to throw in the towel.
Before you do anything drastic (like tossing the idea of making marketing video out the window), it’s important you recognize where you are. At this stage, your time, focus, and expertise are extremely valuable in your business, and to continue the growth trajectory you’re on, you can’t add more to your plate. Your time is more valuable than your money at this stage, and it makes sense to outsource this work to a video editor.
The difference between businesses that scale and those that stay stagnant is delegation. Pure and simple – the owners and managers who get tasks off their plate through delegation, creating standardized procedures, and outsourcing experience growth, while the ones who do everything themselves simply run out of capacity.
If you aren’t sure whether you want to DIY or hire, I invite you to have a non-sales call with me. Let’s talk through where you are in your business and what you’re looking for. I’ll tell you honestly what my recommendations are, even if it’s not in my favor.
I can either recommend which software to use, give you some tips on hiring a budget-friendly contractor, or connect you to a community of over 8,000 editors in which you can post your job request and sort through qualified applicants.
Walk Before You Run
I know you’re anxious to get started. I know because I’ve been there.
However, test each part of the process before you do a full-fledged recording. It would be awful if you did a great take only to find out as you’re editing the video that you were recording using the wrong settings. So, record 5 minutes of audio and video, then:
-
Listen to the audio quality – does it sound far away or like you recorded in the bathroom? If so, there are some tweaks needed.
-
Watch the video with an eye for positioning and lighting – Are there shadows on your face or on the wall behind you? Is the lens focused on your face, or are you blurry? Are you in the center of the frame? Are you too close or too far away?
-
Download the video from your camera onto your computer – Does this require a USB or an SD Card? Were you able to save the video file to your computer easily? *this is a great time to establish a procedure around how your files will be named and where they’ll be organized
-
Import the video and audio files into your editing software – Did the software give you any problems? Were the files the right type for import? Did the software try to auto-sync?
During these test runs, it is a great idea to try several different settings, note which settings worked best, and replicate those settings in future videos to help save yourself time. Similar to how you’d create a standard operating procedure in your business operations, create a word document detailing the steps you take and the settings you need to produce great quality video every time.
If you choose to hire an editor, taking it slow might mean sending them 1-3 videos at first and expecting extra communication as you get to know each other. As an example, during the launch process, I request that we have 2 scheduled Zoom calls prior to the actual launch of the channel. During these two calls, we coordinate, ask and answer questions, troubleshoot, and work through any issues.
Make sure you establish open lines of communication with any outsourced professional – they want to feel successful in their role just as much as you want your marketing efforts to be successful.
Video Marketing That Promotes Customer Engagement
If you’ve visited social media sites recently, you’ll notice much of the video content is very short. These video shorts are designed to educate or give tips to draw in your target audience. Many of these clips are 60 seconds or less, yet still have great audience reach and engagement.
Have a long social media post history? Try repurposing some of your photos and videos into Instagram reels, stories, and YouTube. With minimal effort, you can produce several new videos for minimal or no cost. These can be posted to your social media or used in any other manner you want. These videos could possibly even be edited (this might require some creativity!) together for YouTube or featured video on your website.
Video marketing is all about drawing people in, and current events accomplish that in grand fashion. People want to be a part of what’s happening in their corner of the world, so help unite your followers and discuss important issues.
Do you have happy customers? If so, perhaps you could use your customers’ reviews as stand-alone testimonials on your site, as a video montage of social proof for potential customers, or as a cool way to end your recordings. Kindly ask if they’d be willing to record their own video to rave about you, your business, or your product on camera.
Create A Series Of Video Marketing Segments
Some of the more powerful video clips out there are actually shot in a series. (Remember Wayne’s World?) Consider a video series like “Conversations Over Coffee” or “My Couch Knows Everything.” If you have a method or a process you can walk viewers through, step-by-step, it’s likely to gain traction with your audience.
The benefit of an ongoing series is having the same set and overall topic – allowing you to spend less time coming up with things to discuss. This takes some stress off trying to come up with fresh content and will allow you to move through your content more easily.
Another major benefit of this is your ability to reuse some of your video segments and reshoot small sections for dialog or voice-over. By recycling your footage, you can save a big portion of your marketing budget.
The World Can’t Wait for Your High-Quality Video Content!
We’re breaking perceived barriers to entry here by pulling back the curtains and revealing how simple it can be to stay within budget and still create excellent quality video content to support current customers and expand your reach.
Now your eyes are opened to the fact that high-quality video content can be recorded with the iPhone you already own, a low-cost lapel mic, and then edited using pre-installed software on your computer.
You also have the option (and clear steps to follow if you choose this route) to invest in more expensive gear and a post-production expert so that your time and energy can remain focused on the overall messaging and company growth.
There’s no one-size-fits-all answer. But I do have a one-line that I stand by:
Keep it simple.
If you already record webinars consistently, find a way to replicate the process or reuse the content for your YouTube channel. If you plan on creating YouTube and social media content, consider having a separate setup specifically for each, so your video recording process is streamlined and doesn’t require plugging in fresh equipment and rearranging furniture just to record a different style video.
The last few words on making videos on a budget are this – JUST GET STARTED.
Make the videos, and worry about all the other stuff later. Very few videographers started their careers with perfect videos the first time (or even their 100th time). Learn as you go, and adjust when you need to.
Written by Virginia Elder
More From This Category
Using Video Content to Build Trust and Authority: Key Strategies
SUMMARY: Video content, both long-form and short-form, powers up your brand's trust and authority by resonating deeply with varied demographics, overcoming production hurdles, and outshining other content types across multiple platforms for broader reach. Struggling...

Networking Strategies for Podcast Growth: Essential Tips for Business Owners
Boost your podcast’s growth with smart networking strategies. Learn how to connect with podcasters, influencers, and audiences to expand your reach.

The Step-by-Step Guide to Monetizing Your Business Podcast
If you've been pouring time and energy into your business podcast but struggling to turn it into a reliable income stream, then don't worry, I've got you! Monetizing a podcast takes more than just great content, it needs a strategic approach that blends both direct...
0 Comments
Affiliate Disclosure: Happy Healthy Abundance, LLC dba Podcast Abundance is a participant in affiliate link programs and may accept payment from sponsors as a way to provide you with products, courses, and programs that I love, and may include items from Amazon and any other programs or products I believe will provide benefit you. Affiliate links are located throughout this website. The links provide a small percentage of commission to Happy Healthy Abundance at no additional cost to you. Affiliates and Sponsors have been carefully selected with integrity and I’ll never promote anything or accept sponsorship for a product or course or from a company that I don’t believe will actually improve your life and help you in your journey toward abundance.
0 Comments